How to pack a bike ready for shipping in 10 steps
By Victoria Hazael

A bike ready for shipping
If you are heading off to university, moving to another part of the country or just can't travel with your bike, sending a bike with a courier can be your best option. However, how do you ship a bike safely without it getting damaged on the way? This simple step-by-step guide details how to box up a bike, including the materials you need and the best techniques for dismantling your bike.
Tools required:
- Allen keys
- Adjustable spanner
Packaging materials required:
- Bubble wrap
- Cable ties
- Foam tubing
- Packaging chips
- Large, triple ply box big enough for the bike frame
The process:
1. Find a strong box that is big enough for your bike. You can find boxes for bikes at most bike stores, and they are normally free. The box needs to be large enough to fit the bike and the different parts you will be removing. A specialist bike box, or a triple ply box would be best suited.
2. Remove any accessories, including lights, water bottles, speedometers and mudguards.
3. Remove the pedals by turning the bolt of the right pedal counter-clockwise with your wrench, and vice versa for the left pedal. This is needed so your bike fits more easily into the box.
4. Shift the bicycle chain onto the small chain ring and largest rear cog.
5. Loosen and remove the seat post and seat as a unit. Once removed, re-tighten the seat post bolt so the seat does not fall out. If your bike is older, just unscrew the bolt or nut that is used to keep it in place and lift the seat from the frame.
6. Time to remove the front wheel. Thankfully, this is a simple job, especially if you have quick release bolts. Undo this and then slide the wheel through the brake blocks and set the wheel to one side. Don’t forget to let some air out of both tyres – particularly important if your bike is travelling by air.
7. You will now need to remove the handlebar. Most modern bikes allow you to remove the handlebar only. Simply remove the bolts from the stem face plate to detach the handlebar, keep the brake and gear cables as they are and slowly lower the handlebar, turning it vertically so it slides down by your front forks. If you have an older 'quill' system it is easier to remove the handlebars and quill stem as one by simply undoing the stem bolt. After removing the handlebar, rotate the fork and stem so they are facing backwards.
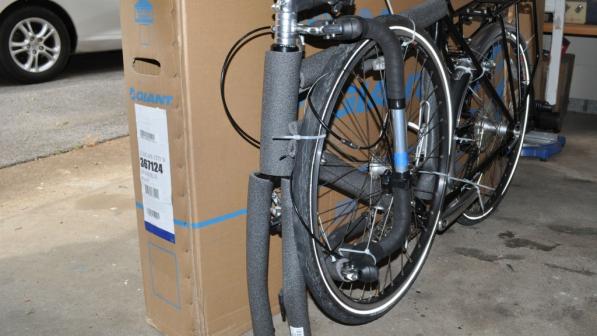
8. Wrap the frame and handle bars in foam tubing. You can use normal foam layers by wrapping them around a couple of times.
9. Fill the bottom of your box with two inches of bubble wrap or packaging chips. Then lift the frame and place inside of the box and fill all remaining space around it with packaging chips or bubble wrap. Remember to keep attached de-assembled handlebar still vertical. Now you can place the front wheel down the side of the box and remember to put all your bolts, screws and accessories in as well (secured in a separate box or bundled together in a plastic bag). Separate the main bike frame from the wheel and accessories with packaging chips and bubble wrap.
10. Secure your box with plenty of packaging tape. Make sure to wrap all seams in three layers of tape and then layer tape 3 times in a vertical and horizontal fashion around the box. You then need to clearly attach the shipping labels to the box and arrange for the pickup and delivery of your bike.
This guide was written for Cycling UK by Parcel Hero.

